

ERPNext + atoship
Ship your ERPNext Sales Orders without ever leaving ERPNext — compare live rates from all major carriers, buy a label, bulk-ship, and track. The tracking number is written straight back onto the order.
How it works
atoship for ERPNextis a Frappe app that installs into your own ERPNext site. It adds shipping directly to your Sales Orders — the same order you already sell against. atoship is a thin client: all rating, carrier routing, and label generation run on atoship's API, and only real, name-brand carriers are ever shown — never backend aggregators.
Submit a Sales Order
Your normal ERPNext selling flow — no changes
Ship it with atoship
Compare carrier rates and buy a label
Tracking writes back
Tracking number + carrier written onto the Sales Order
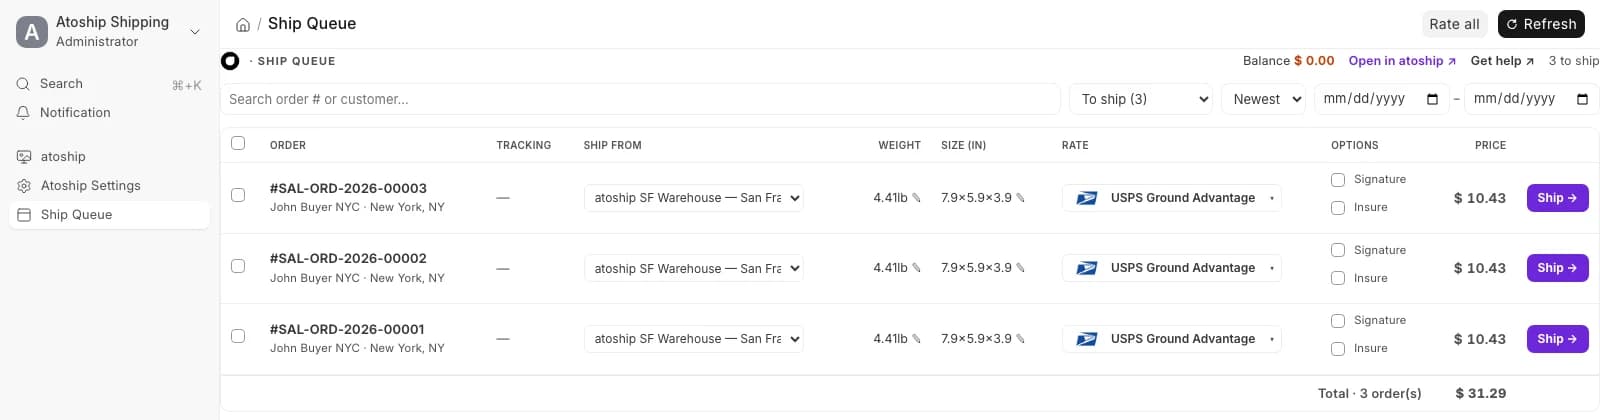
The Ship Queue (/app/atoship-ship) — ship every order from one table.
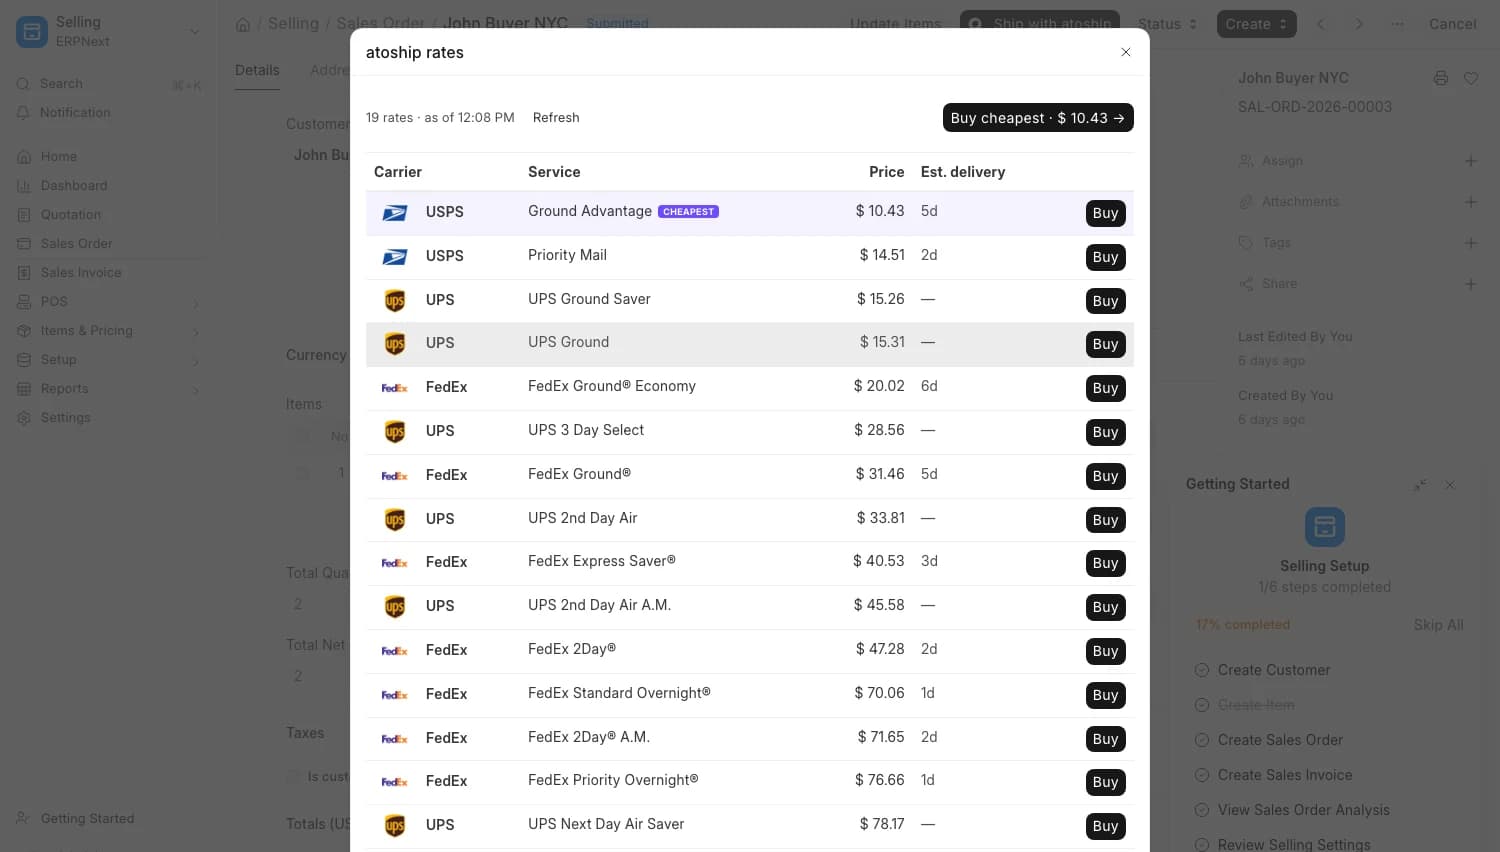
Live rates on a Sales Order — compare and buy right in the form.
Installation
Self-hosted, installed via git. atoship for ERPNext is a Frappe app you install from GitHub with bench— there is no marketplace "connect your store" step. It works on any self-hosted ERPNext, and on Frappe Cloud via a private/custom app.
Step 1 — Install the app
From your bench directory, pull the app from GitHub, install it onto your site, and run migrations:
bench get-app https://github.com/atoship/atoship-for-erpnext
bench --site your-site install-app atoship_shipping
bench --site your-site migrate
Replace your-site with your ERPNext site name. The repo is public and MIT-licensed: https://github.com/atoship/atoship-for-erpnext.
Step 2 — Add your API key
In ERPNext, open Atoship Settings, paste your atoship API key, and click Test Connection. Use a live key (ak_live_…) to buy real labels, or a test key (ak_test_…) to dry-run the flow without spending. You can create a key from your atoship dashboard.
Step 3 — Set your defaults
Still in Atoship Settings, set your default Ship-From Address, a default box / package weight, and your preferred label format. These become the starting point for every order — you can still override the ship-from, weight, and size on any individual shipment.
Where you ship
Once installed, atoship shows up in three places inside ERPNext — pick whichever fits how you work.
1 · The Sales Order form
A Ship with atoshipbutton on the order: fetch live rates, pick one, and buy the label. After it's bought you get Print Label, Update Tracking, and Track Package right there. Rates are cached, so re-opening the order is instant.
2 · The Sales Order list
Select several orders, then Actions → Ship with atoship to bulk-buy their labels in one go. An Open Ship Queue button takes you to the full workbench.
3 · The Ship Queue /app/atoship-ship
A native page that is your full fulfillment workbench: every submitted, unshipped order in one table, each row with its own ship-from, editable weight and size, and an auto-fetched rate you can switch. Toggle signature or insurance, then Shipin one click — or select many and buy them all from a sticky bulk bar. Shipped rows show tracking plus Print and Cancel (void + refund).
What gets synced
ERPNext → atoship
- Sales Order number & date
- Customer name & email
- Shipping address
- Items with quantity
- Package weight & box size (per row)
- Currency & order totals
atoship → ERPNext
- Tracking number & carrier + service
- Label PDF (for printing / reprinting)
- Live tracking status on the order
- Void + refund state when a label is cancelled
Tracking is written straight back onto the Sales Order, so your team and customer records stay in ERPNext — no separate shipping tool to reconcile.
What you get
Multi-carrier rate compare
Live rates from all major carriers side by side, cheapest first — for a single order or across the queue.
One-click & bulk buy
Buy a single label from the order, or select many and buy them all from the sticky bulk bar in the Ship Queue.
Signature & insurance
Require a delivery signature or add shipment insurance per order — priced and applied at purchase.
Void & refund
Cancel an unused label right from the order or queue — atoship voids it with the carrier and refunds your wallet.
Tracking writeback
The tracking number, carrier, and label are written straight onto the Sales Order — nothing to copy by hand.
Discounted rates, no monthly fee
Discounted carrier rates with no per-label monthly fee — you simply pay for labels from your atoship wallet.
Parcel shipping only. Freight / LTL is out of scope.
Requirements
- ERPNext v15+ (self-hosted or Frappe Cloud)
- Shell / bench access to install the app via git
- An atoship account with a funded wallet
- An atoship API key (
ak_live_…; useak_test_…to dry-run) - A default Ship-From address (US origin)
Troubleshooting
Test Connection fails
Double-check the API key in Atoship Settings — a live key starts with ak_live_and a test key with ak_test_. Your ERPNext server also has to be able to reach atoship's API over HTTPS.
No rates show up for an order
Rates are pulled live, so a missing/invalid shipping address, a missing Ship-From, or a zero weight will return nothing. Set a package weight and size on the row and make sure the ship-from is complete.
Only some carriers appear
atoship only ever shows real, name-brand carriers — not backend aggregators. Which of them return a rate depends on the destination, service, and package; international lanes in particular vary by carrier.
Buy failed / no tracking written
Tracking is written back only after a label is bought successfully. If a purchase fails (for example an insufficient wallet balance), no tracking is written — top up your atoship wallet and retry from the order or Ship Queue.
The app or Ship Queue doesn't appear after install
Make sure install-app atoship_shipping andmigrate both completed, then clear cache and reload (bench --site your-site clear-cache). The Ship Queue lives at /app/atoship-ship.
bench get-app \
  https://github.com/atoship/atoship-for-erpnext
bench --site your-site \
  install-app atoship_shipping
bench --site your-site migrate
Public repo · MIT · ERPNext v15+