

Odoo + atoship
A native Odoo module that adds atoship as a delivery carrier. Compare live carrier rates on the Sales Order, buy the label on the Delivery, and ship a whole day's orders from one Ship Queue — with tracking written straight back onto the delivery.
How it works
AtoShip Shippingis an Odoo module that installs into your own Odoo database and adds atoship as a delivery carrier. It works on your normal Sales Order and Delivery flow — no new documents to learn. atoship is a thin client: all rating, carrier routing, and label generation run on atoship's API, and only real, name-brand carriers are ever shown — never backend aggregators.
Confirm a Delivery
Your normal Odoo selling & delivery flow
Ship it with atoship
Compare carrier rates and buy a label
Tracking writes back
Tracking number + carrier written onto the Delivery
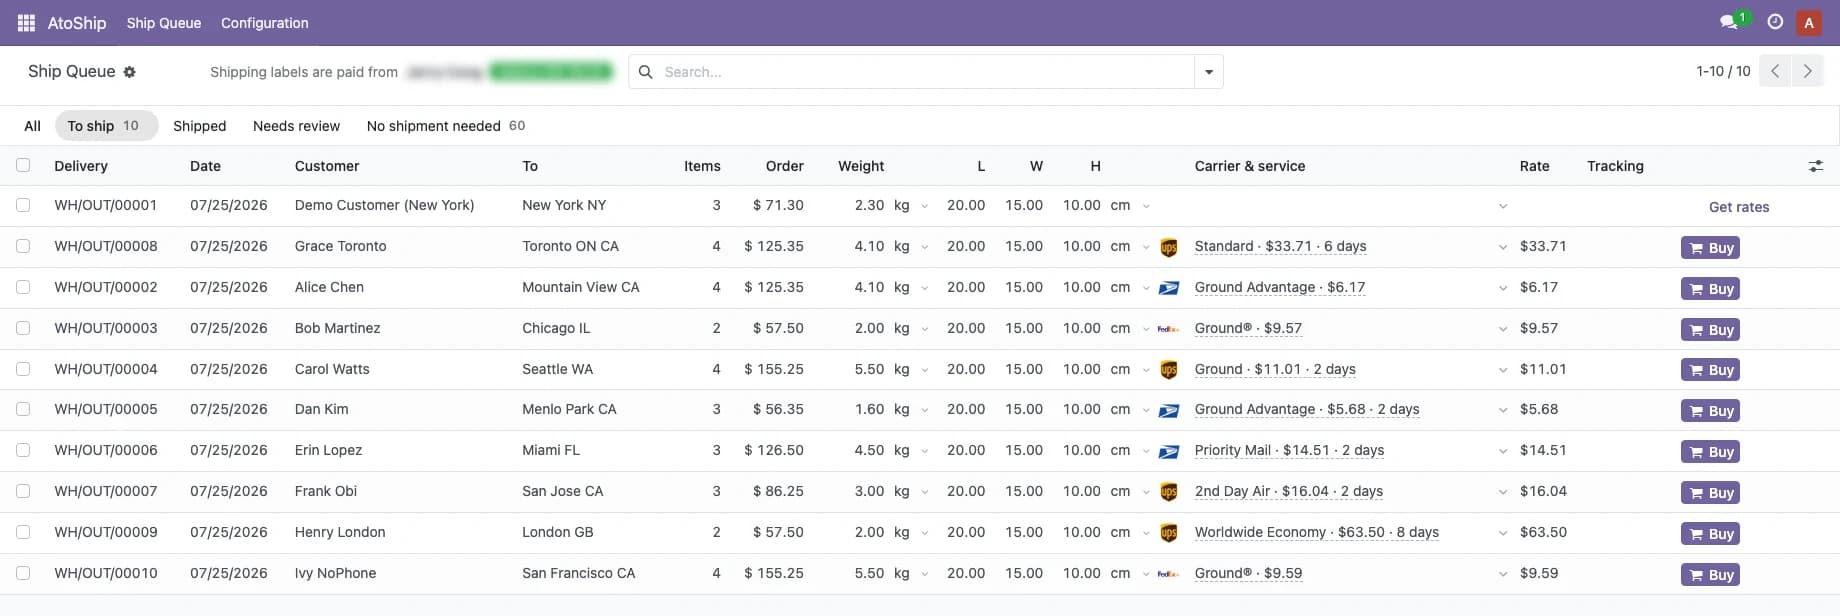
The Ship Queue (AtoShip → Ship Queue) — work every outbound delivery from one table.
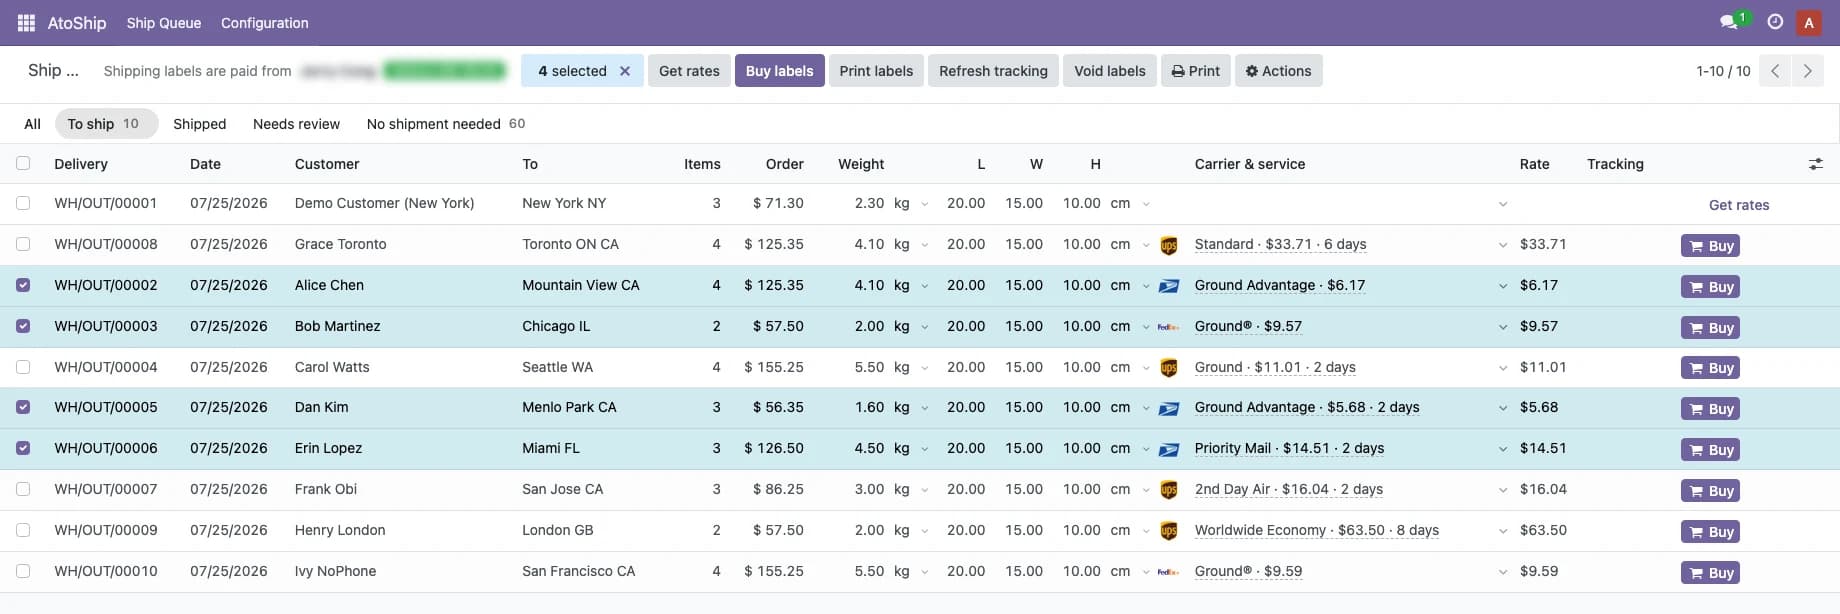
Select many deliveries and buy every label in one go.
Installation
Self-hosted, installed as an Odoo module. Clone the branch that matches your Odoo series into your addons path, then install it from the Apps menu. Works on Odoo Community and Enterprise, series 17.0, 18.0 and 19.0 — it depends only on the standard stock_delivery module.
Step 1 — Add the module to your addons path
Clone the branch matching your Odoo version (17.0,18.0 or19.0) into a directory on your Odoo server, add that directory to your addons_path, and restart Odoo:
git clone -b 19.0 \
  https://github.com/atoship/atoship-for-odoo.git \
  /opt/atoship-addons

# add /opt/atoship-addons to addons_path, then restart Odoo
The repo is public and LGPL-3: https://github.com/atoship/atoship-for-odoo. It's also on the Odoo Apps Store.
Step 2 — Install the app
In Odoo, go to Apps, click Update Apps List, search for AtoShip Shipping, and install it. A new AtoShip menu appears in the top bar.
Step 3 — Connect to atoship (OAuth)
Open Settings → Shipping → AtoShip and click Connect to AtoShip. You'll approve access on atoship.com and be redirected back — there are no API keys to copy. The connection uses OAuth 2.0 (authorization code + PKCE); tokens are stored server-side per company and refreshed automatically. Then set your default ship-from address and package defaults.
Where you ship
Once installed and connected, atoship shows up in three places inside Odoo — pick whichever fits how you work.
1 · The Sales Order
Pick AtoShip as the delivery method and Get Rate to see live carrier prices right on the quotation — so shipping cost is known before you confirm.
2 · The Delivery Order
On the delivery (stock.picking), compare rates and Buy Label. You then get Print Label, Track, and Cancel (void + refund) in place, and the tracking number is written onto the delivery.
3 · The Ship Queue AtoShip → Ship Queue
Your full fulfillment workbench: every outbound delivery in one table, each row with its own ship-from, editable weight and dimensions, and an auto-fetched rate you can switch. Toggle signature or insurance, then Ship in one click — or select many and buy them all from the bulk bar. Shipped rows show tracking plus Print and Cancel.
What gets synced
Odoo → atoship
- Delivery / Sales Order reference
- Customer name & email
- Shipping address
- Items with quantity
- Package weight & dimensions (per parcel)
- Signature & insurance options
atoship → Odoo
- Tracking number & carrier + service
- Shipping label (for printing / reprinting)
- What was bought, shown on the delivery
- Void + refund state when a label is cancelled
Tracking is written straight back onto the Delivery, so your team and customer records stay in Odoo — no separate shipping tool to reconcile.
What you get
Multi-carrier rate compare
Live rates from all major carriers side by side, cheapest first — for a single delivery or across the queue.
One-click & bulk buy
Buy a single label from the delivery, or select many and buy them all from the bulk bar in the Ship Queue.
Signature & insurance
Require a delivery signature or add shipment insurance per order — priced and applied at purchase.
Void & refund
Cancel an unused label right from the delivery or queue — atoship voids it with the carrier and refunds your wallet.
Tracking writeback
The tracking number, carrier, and label are written straight onto the Delivery — nothing to copy by hand.
Discounted rates, no monthly fee
Discounted carrier rates with no per-label monthly fee — you simply pay for labels from your atoship wallet.
Parcel shipping only. Freight / LTL is out of scope.
Requirements
- Odoo 17.0, 18.0 or 19.0 (Community or Enterprise)
- Server / addons-path access to install the module
- The standard
stock_deliverymodule (base dependency) - An atoship account with a funded wallet
- A default ship-from address (US origin)
Troubleshooting
"AtoShip is not connected"
Open Settings → Shipping → AtoShip and click Connect to AtoShip. If the connection expired, the same screen lets you reconnect — tokens refresh automatically once connected.
No rates show up for a delivery
Rates are pulled live, so a missing/invalid shipping address, a missing ship-from, or a zero weight will return nothing. Type the weight into the Ship Queue (or set weights on the products) and make sure the ship-from is complete.
Only some carriers appear
atoship only ever shows real, name-brand carriers — not backend aggregators. Which of them return a rate depends on the destination, service, and package; international lanes in particular vary by carrier.
Buy failed / no tracking written
Tracking is written back only after a label is bought successfully. If a purchase fails (for example an insufficient wallet balance), no tracking is written — top up your atoship wallet and retry from the delivery or Ship Queue.
The AtoShip menu doesn't appear after install
Make sure you cloned the branch that matches your Odoo series, that the directory is on your addons_path, and that you clicked Update Apps List before installing. Restart Odoo and reload if the menu is still missing.
git clone -b 19.0 \
  https://github.com/atoship/atoship-for-odoo.git
# add to addons_path,
# then Apps → Update Apps List
# → install "AtoShip Shipping"
Public repo · LGPL-3 · Odoo 17 / 18 / 19